Transcribing Videos – How to Multiply the Value of your Content

by Sam Lee
September 15, 2020
Do you have a YouTube channel, a video blog series, or even do consistent live-streams? If you do, I’ll go through a step by step guide on how to take your video content and turn it into additional written content for you to publish on your website and your social media accounts.
What is the benefit of having different forms of content?
Video content is the most popular form of content but there are plenty of people that would prefer to consume it in written format. A great way to get more value out of your video content is turn it into a blog post.
With multiple forms of content, you give the consumer the option to choose their preference. The reasons someone might want to read a blog instead of watch a video is to save time by having the ability to skim and skip directly to a specific part of that blog.
Blogs are also easily shared on social media platforms and can be searched for through keywords. This data is picked up by Google’s search engine and helps optimize your google search rankings.
It’s an easy process that can amplify the reach of your existing content so here is a simple guide that you can utilize.
How to get your video file into a written transcription using Transcribe Wreally.
Before we do anything, you need to make sure you have the file of the video. If you have YouTube videos or live-streams, you will need a downloaded file and not just a link to them.
There are a lot of great transcription software applications out on the market but we will be using ‘Transcribe’ in our process. We can touch up on some of the transcription’s software applications further down the road.
Locate your video files and head to www.transcribe.wreally.com.
- Create an account to use the automatic transcription software.
- After logging in, click on the tab “transcriptions” on the top left-hand corner next to the “home” tab.
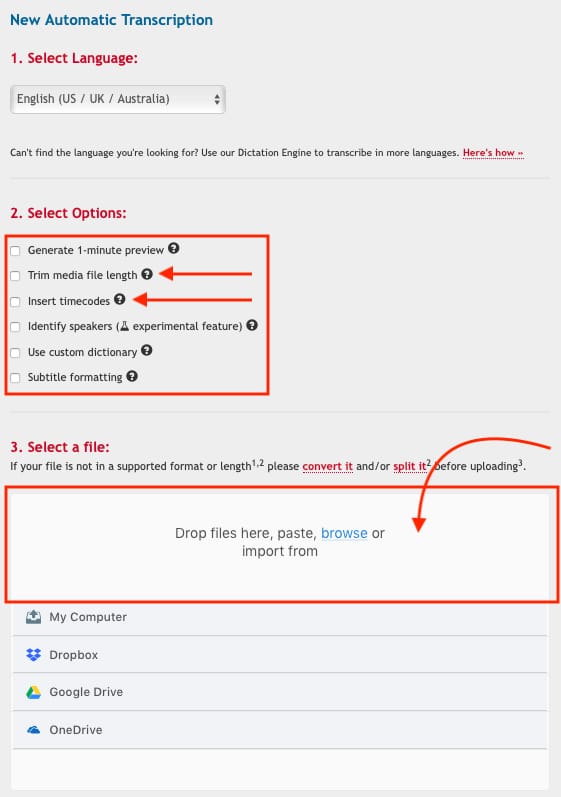
- When you get to the “transcriptions” page, click on “New Automated Transcription”.
- Select the language that your video is in.
- ‘Trim media file length’ is a nice option to cut off excess intro’s and outro’s to your video that doesn’t need to be transcribed. Also avoid ‘Insert timecodes’ unless you specifically want timestamps all throughout your transcription.
- Upload the video file into the designated area and you will get an email notice from Transcribe when it’s finished.
Edit Your Plain Text
Now that you have your transcription, it is time to edit the text. Transcribe Wreally claims a 90% accuracy rating as long as the audio is clear but you’re going to want to go through the text and make sure it is readable.
Since we’re taking content that is originally made to be presented in the form of video, you are going to have to edit and tailor the text to be reader friendly.
Add compelling titles and subtitles that really highlight the main focal points of your post. Feel free to add images and graphics that will help compliment what your blog is about.
Publish your Blog and Share on Your Social Media Accounts
Once you’ve edited the text, added your titles, and some imagery it is finally time to publish your post. It’s a great way to get more engagement out of your content and possibly reach a larger audience.
Share with your friends on social media or to your network on LinkedIn. You now have a video series as well as a blog! It’s a simple process that can bring you more value and reach from your existing content.